
 m
m p
p -z
-z sh
sh n)
n)
n.
1.
a. The combining of distinct parts or elements to form a whole.
b. The manner in which such parts are combined or related.
So many times I've been asked about composition, whether in bead embroidery or bead weaving. I guess it really comes down to the materials you choose..... the main focal/s, the seed beads and their sizes, the size of the piece you want to create and also the intended wearer and the occasion.
The composition of a necklace firstly starts with the length and size of the piece.
Here are some perfect/ideal lengths for jewellery.
Collar
(12-13 in./30-33 cm) This style fits snugly around the base of the neck and is normally made up of several close-fitting strands. The necklace may be enhanced with jeweled spacers or a large centerpiece. The look is very formal and is perfect for evening wear.
Choker
(14-16 in./36-41 cm) The choker has slightly more drape than collar length and usually falls above the neckline. The look can be made more casual by mixing accent beads — such as crystals and semi-precious stones — to bring a more eclectic style to the classic pearl design.
Princess
(17-19 in./43-48 cm) A popular style for graduated pearls. This versatile length looks great with high or low necklines.
Matinee
(20-24 in./51-61 cm) Slightly longer than the princess. Measure carefully when fitting this style as it should fall just above the bust line. This length works best when paired with a high neckline.
Opera
(28-36 in./71-90 cm) Think formal for this style. Elegant and refined, this piece can be worn single or wrapped as a double strand depending on the outfit it is paired with.
Rope
(36 in./90 cm and longer) Long and lovely ropes of pearls may be looped around the neck to create any length. Leave it long or wrap it several times around the neck. This necklace makes the wearer shine in the spotlight.

When delving into the world of beading, jewellery is made with various components and different layers, but they will still conform to the guidelines above. Composition in beading, when looking at the 'layout' of a piece can be symmetrical, asymmetrical or freeform. In this article, we'll be looking at these in more detail. Plus a few other things.
Symmetrical: An object that has two (2) identical sides, that are divided by a line of symmetry. This symmetry can then be divided again and again to create the desired pattern.
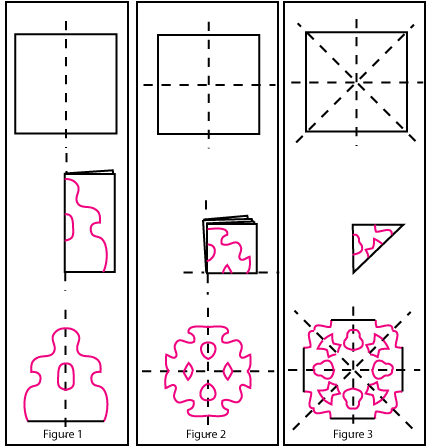
This type of design, whether single or multi-level, is relatively easy to construct because it is about balance. You can create an image on paper first to see what your overall piece will look like, or you can start by making the components and moving them around on your beading mat to see what works for you. Either is fine. Everyone works differently, so don't bog yourself down with how other people do this, you do what works for you.
Once you've settled on a layout, you can see what extra bits will be needed. Then you have to work out how to put the components together. This step is crucial in giving the overall piece, uniformity. It's in the detail of joining components together, that will show the wearer/buyer that every detail was taken into account.

The stitches/techniques used will determine how a piece will be finished most of the time. So once you've settled on a design, you then have to work out a 'rope'. As you all know, there are a myriad or ropes to choose from, but not all ropes will work on every design layout....you need to remember that. Your rope will make your piece outstanding or simply 'just ok'.
If you look at the example on the right, there are curves (ovals) and triangles in the overall design, and the rope I decided on, needed to be an extension of this. So I chose a flat spiral weave because it had the roundness with the pearls and the pointiness of the triangles by the use of bicones at the middle of the spiral sections. This therefore became an extension of the focal front section.
Your rope also has to have a soft drape on the wearer, that way it not only supports the whole piece, but is also comfortable to wear.
For a bead embroidered piece, the principle is still the same except you're sewing your beads onto a base or foundation.

Firstly you decide the shape of the collar and whether it will be whole or have negative spaces. Feel free to use the template above, or alter it to your design style - print it out, and enlarge it to suit your neck size.
Secondly you'll need to select the focal crystals, cabochons or whatever you're intending to use, and then the seed beads that will work up the piece.

Once you've made your selections, you'll need to draw a rough placement of the focals on your foundation material. Then the direction or movement of the seed beads and their groups. When you're happy with the layout, then its time to start. At this time, other beaders have said to me that they have a multitude of concerns that make them not start. Their concerns are 'what if it doesn't look good?' What if it doesn't work?' 'What if I make a mistake?' And this is before even glueing anything on.... !

Asymmetrical: Is the absence of symmetry. Its more about creating a complete picture as you would find in nature.


'Icelandic Swirl' to the right, is representative of a Rock Pool like the photo above. It is a combination of bead embroidery and bead weaving. The large focal represents the pool itself with the swirling water that enters it as it cascades over the rocks. The smaller pearls and shells are things that may be found in and around the rock pool. The glass domes represent pockets of still water.
The piece you create doesn't have to be whole, you can have negative spaces which add interest and also add to the asymmetry.
Also, if your piece requires a rope to finish it, the rope doesn't have to be the same on both sides. That's the beauty of asymmetry, you can do something different on both sides. In this example, I have used twisted Ndebele on one side and Russian spiral on the other. I chose these to represent the different ways that water swirls and travels towards the rock pool.
Free-form: Is mainly done in Peyote stitch. Although in my freeform creations I bead a piece a couple of ways.... #1 create a base on which I embellish in free and random ways. This is usually good for bracelets as it gives the whole piece, sturdiness. or #2 start beading and swap and change beads and bead sizes as I go - this is mainly how I do it. Bead, in all and erratic directions. There are generally no rules other than make sure the piece is sturdy, and has enough passes of thread so it doesn't come apart.
 Personally, I find the beauty of free-form, is you can do whatever you like, in whatever stitch you want and in whatever direction, and it will be fine. the one thing I would advise though, is to have a basic size and shape in mind. You can bead 'blindly' or you can, believe it or not, draw out a basic shape and direction of your design, and follow it. Either way is fine.
Another crucial element in freeform is the colour palette. Although it may be tempting to use up that bead soup that seems to be ever growing, it is always better to minimize the colours used, to a palette that is complementary.... maybe 4 or five colours in the same tones. Have a few feature beads or elements that create interest. When you use larger beads as features, don't forget you can also bead over them, you're not confined to beading around them.
Make your piece looks full of life and movement, have areas that are high and areas that are low, and don't forget that negative space also add to the intrigue, which will lead the viewer's eye around the piece. My first freeform piece, was haphazard in its commencement, as i really didn't know what to do.... so I decided to incorporate every stitch I knew at the time, and see what would come out of it. It worked out beautifully, and was bought immediately the first time I displayed it at a show.
So if you are still hesitant about trying freeform beading, I say give it a go.... but you need to be relaxed, and not try to control your piece.


I think the best place to find excellent colour schemes is in nature. The hard work is done for you. When you go for walks, or picnics, or out and about.... always have your camera with you. With today's technology, a camera is a s close as your mobile phone. Take lots of photos of things you see.... build a library of images that are bountiful in colour.... they will come in handy... not only for colour schemes, but also as subject matter for your next creations.
Feature Items: Collect collect collect.....
If you don't have a collection, you need to start one....LOL. You need to have lots of feature pieces available in your stash, to give you inspiration. Not saying you cant buy anything new for a piece, Gosh! that's what beaders live for! but its really good to have items available at your fingertips.


And don't limit yourself to what is most used.... step outside the box and collect things that will make your work unique to you. If I cant find a particular feature item, then I will make it from polymer clay, or PMC.
There is a multitude of other things we can look at.... but I think I shall close this article with clasps....LOL... pardon the pun :)

Whether you choose on of the many prefabricated clasps that are in the marketplace, or make your own, the thing to remember with clasps, is that they need to be secure enough so they don't come undone, and in saying that, they need to be easy enough for the wearer to do up and undo, on their own.
For necklaces I like to either use magnetic clasps, as they are easier for the wearer, or I make my own to suit the piece I have just created. It is really lovely to create a clasp that is an extension to the front of the piece and makes a statement on its own. Clasps also don't have to be at the back of a piece, they can also become a feature at the front.


Take your time in selecting the perfect clasp, it will definitely make your piece worth seeing from the front as well as the back. Above you will see 2 types of clasps that can be used at the front.
So when you create your next piece, do take into account the composition of your piece, and the intended wearer. The colour palette you're going to use. The subject matter. And most of all, just go for it... don't be afraid to try something new. It isn't set in concrete. Its OK to make mistakes and change your design as you go. Or to simply change your design half way through if you think there is a new direction you'd like to take or there is a better way of doing something.
But mostly, enjoy playing with composition, whether it be in bead weaving, bead embroidery, or freeform beading, and enjoy the process. If you don't push yourself beyond your comfort zone, you will miss out on so many possibilities.
Happy Beading!
Neva


